Welcome back to day 8 of Thingadailies. Want to play along? The full video is here.
Today's starting point: 7:47
Ending point: 9:24
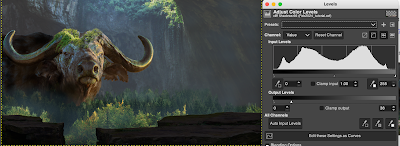
Today we are going to fix the light on the cliffs we added yesterday. This is our starting point:

Step 1: Add shadows
This should be starting to look familiar. We add a layer, drop to levels so it's very dark, then use the airbrush to mask the top of the stones to allow the lighter layer to show through.
Post airbrushing to let the original through:

Step 2: Cut off a chunk of the rock.
This would have been easier before I copied the layer for the shadows, but I just had to remember to cut the selected area from two layers. (And not from the layer mask. I swear, if I didn't have a decent handle on layer masks, this project would be a nightmare.)

So now it looks like this:

At this point, we used the smudge tool to lengthen some grass that had been cut off, and again, that would have been easier before there were two layers. (Maybe Photoshop allows you to modify color levels on a copy of a layer without actually copying the layer? I feel like there's some difference here. Or I'm doing it wrong. That's always the prime suspect.)
Step 3: Add sunlight
The layer gets copied again and some color balance magic occurs (mostly shifting toward yellow, which I guess makes sense for sunlight), and then it gets masked and airbrushed to allow through yada yada yada.
(Except there was some stuff with changing the layer to layer color dodge with fill 73% that I couldn't figure out how to replicate in GIMP. But I think it looks okay anyhow. Sure, it's fine.)

So now it looks like this:

I think it's coming along nicely!
Tip of the day:
If you're going to modify the image, do it before you have the layer copied multiple times for shadows and highlights.
No comments:
Post a Comment