Wednesday, February 7, 2024

Day 7: Add the Cliff

Welcome back to day 7 of Thingadailies. Want to play along? The full video is here.

Today's starting point: 6:54

Ending point: 7:47

I have to say, even though I'm doing the equivalent of paint-by-numbers for photomanipulation, I'm really pleased with how this is going.

Let's get on with things! Here's what we started with today:


Step 1: Add fog

Create a new layer (yes, I forgot this the first time through and had to back up), pick a sort of steel blue color, and then use the airbrush tool with a large (500 px) brush and a very low flow (4%) to add some haze to the forest and along the right side.


I'd never really used the airbrush tool before, so I didn't realize you could turn the flow down like that. (Okay, yeah, that should have been obvious, but it wasn't.) It probably would have been better if I'd gotten out the drawing tablet because my airbrush strokes were choppy since I had to keep moving my thumb on the mouse. But I think it's fine.

Step 2: Get the cliff

This is the image we started with.

From there, I added a mask to remove the background and used the clone tool (poorly) to get rid of some of the vegetation, and ended up with this:

Step 3: Copy the cliff into the main image

My first attempt to copy the image only copied the black and white mask. My second attempt only copied the original image. I created a "new layer from visible" and copied that. (My other option would have been to apply the layer mask first, but if I'd needed to recover something I'd masked out, it would have been a pain.) Anyhow, I'm writing all this here because I suspect there's a way to copy the visible image without going through a second layer, but I don't know how to do it yet.

Anyhow, I copied and scaled into the lower right corner, then added a second copy (flipped) into the lower left corner, and ended up with this:


Tomorrow there will be much masking and changing the stuff I added today so the light source is correct, but I think things are going well.

Tip of the day:

Turn the flow down on the airbrush if you're trying to add haze to your image.

Tuesday, February 6, 2024

Day 6: Let There Be Light!

Welcome back to day 6 of Thingadailies. Want to play along? The full video is here.

Today's starting point: 5:34

Ending point: 6:54

Today's changes were a big part of why I chose this particular project. In this 80 seconds, we change the direction of the light that's hitting the forest. That's pretty amazing and really useful. One of the challenges of using multiple photos in a composite is that the light source isn't always coming from the same direction.

(Yes, I feel a little stupid for not figuring out how to do this on my own, but it's one of those things that is only obvious after you see someone else do it. For me, anyhow.)

Today's starting point:


Step 1: Give the buffalo a shadow

In this step, I copied the forest layer, darkened it using the levels, masked it, and then allowed that layer to come through around the buffalo's side and where the head should cast a shadow, based on the light hitting the buffalo's face.

Did I put the shadows in the right place? Eh... Sure, it's fine.


Step 2: Light in the forest

Another copy of the forest layer, but this time, I lightened it (using curves) and highlighted the sunny side of the trees. This was duplicated a couple more times with various levels and curves. I have some doubts about my choices, but I'm comforted by the fact that much of this will be covered in a layer of fog tomorrow.

In progress...


And where I stopped and said "Sure, that's fine."


For comparison, here is a screenshot from the video at this point:

I mean... my errors choices are starting to pile up a bit, but I think I'm doing okay here.

Stay tuned for tomorrow when I add fog and cover up all my mistakes!

Tip of the day:

Layer groups really help keep things tidy.

Monday, February 5, 2024

Day 5: Clearing the fog

Welcome back to day 5 of Thingadailies. Want to play along? The full video is here.

Today's starting point: 4:09

Ending point: 5:34


A quick note before we start: Karen noticed the background was flipped, so I'm flipping it to match the video, just in case that turns out to be important later. Could I just watch the rest of the video to see? Of course I could, but it's easier just to flip the background image. (And now that I think about it, that changes the direction of light in the background image, so it probably is important...)

Anyhow here's where we are at the beginning of day 5:


And we're off!

Step 1: Bring in the ivy!

As always, we horizontally flip it. We've added... four images so far? And he's flipped ever single one of them. I can learn this secret of the masters.

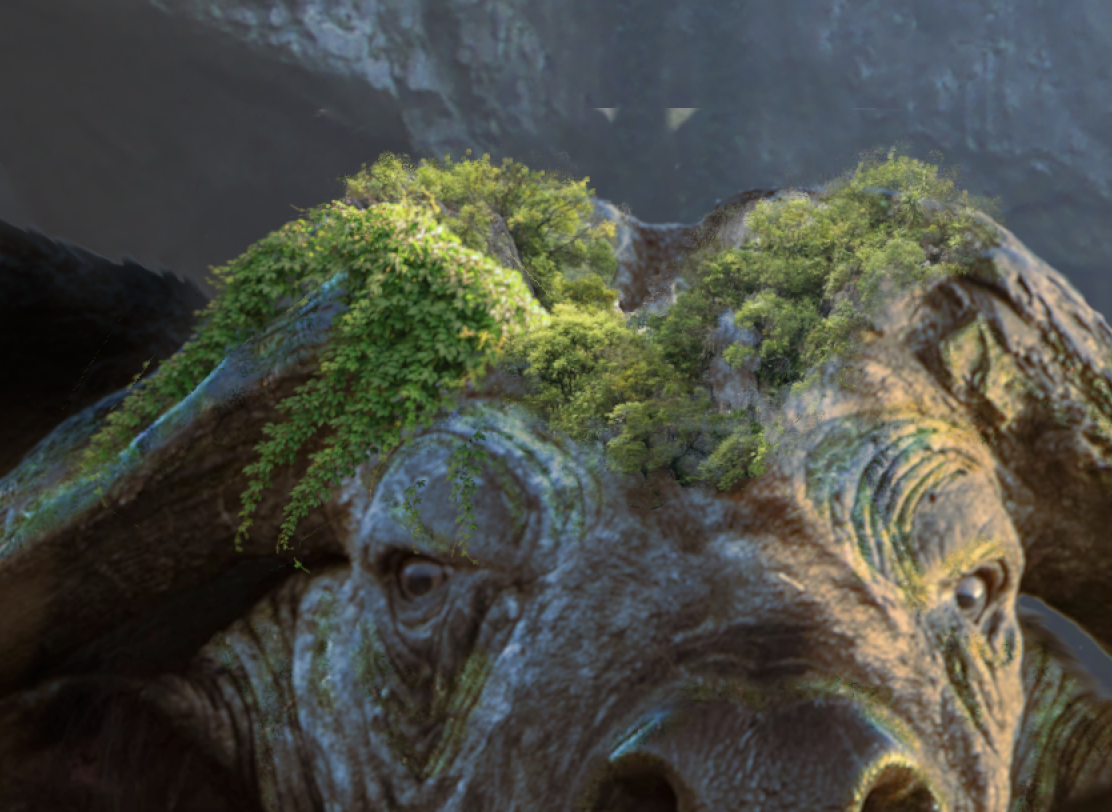
Anyhow, I brought in the ivy and positioned it on the horn like so:


Step 2: Color balance magic!

One thing I've noticed is that he always tweaks the cyan and yellow, but never the magenta. Is this important? I really do need to learn more about this at some point, but for now, I will follow the example. The green became more vibrant. (Right now, it kind of sticks out compared to the jungle toupee.)


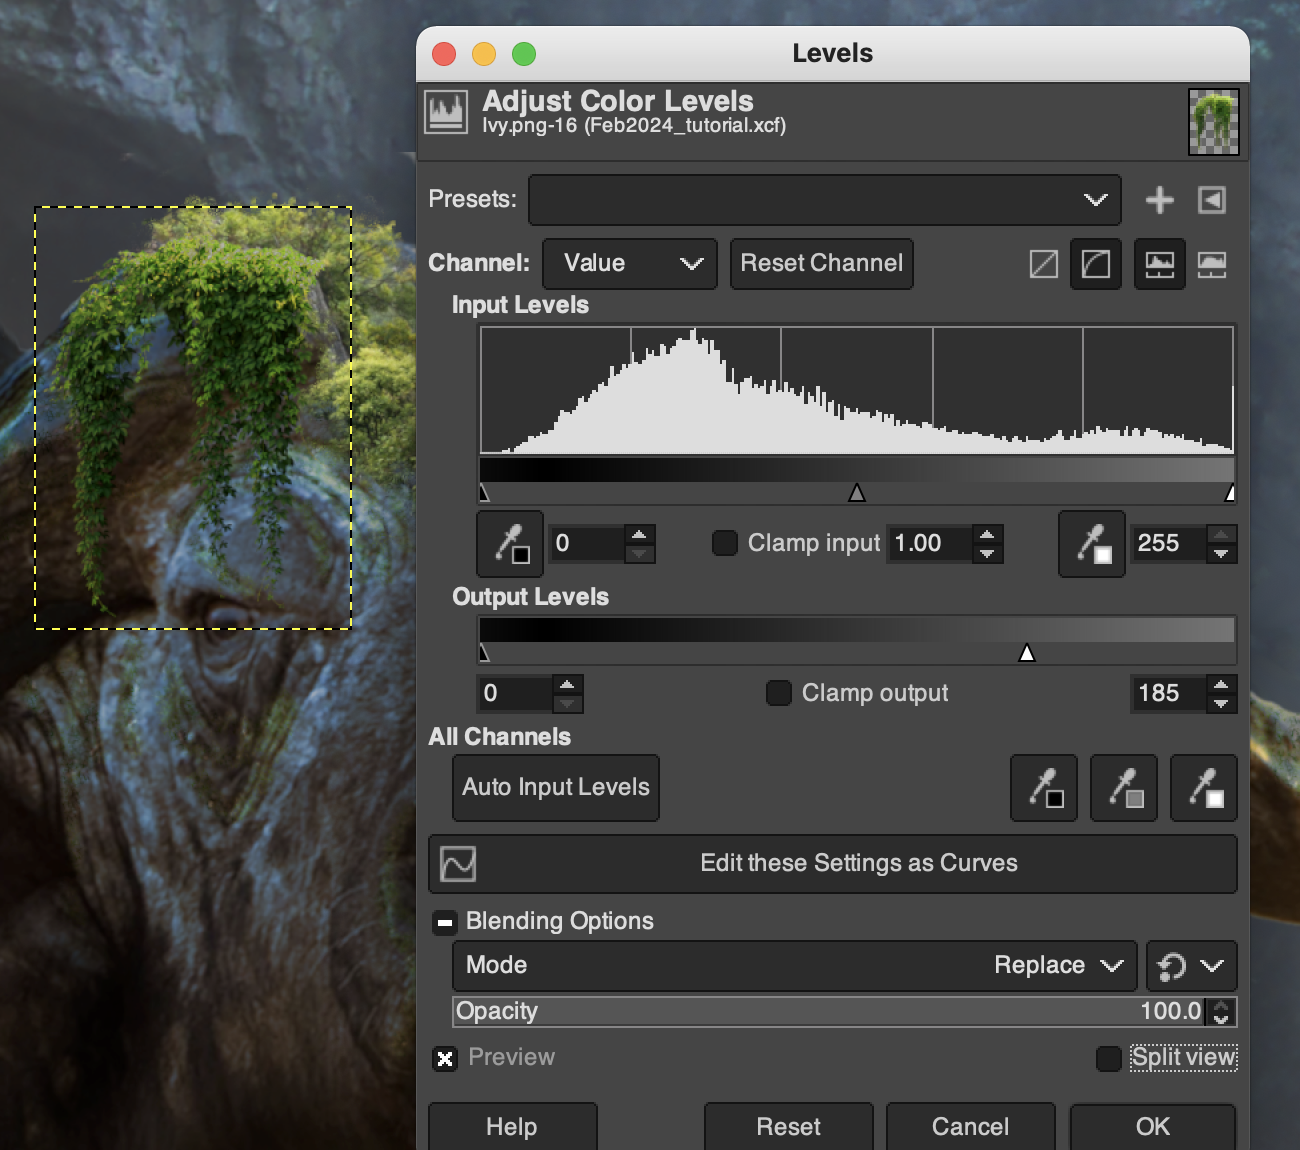
Step 3: Color levels magic! (Part one)

Now it is less vibrant, though it still doesn't quite fit in with the toupee.


Step 4: Warp the ivy

Hm. This is the same thing I ran into before. My warping ability is really not good. But I got something close-ish.


Step 5: ???

There was a little weirdness going on here. He adds a little ivy mustache, then gets rid of that (or hides it?), and then sets the levels using different settings. So... I'm going to do my best to make this work.

I messed with the color balance and levels here until it seemed like the ivy matched the jungle. Am I learning something? Or did I just screw something else up and I'm going off piste? I think we all know the answer to that. Anyhow, here's where that got me:


Step 6: Bring in the foggy jungle


And then mask out the fog while highlighting the trees. I did my best. Sure, that's fine. Anyhow, here's where we end day 5.


Tip of the day:

Lock your finished layers in place so you don't accidentally move them around and end up with pixels on the side where the picture is missing. Oops.

Sunday, February 4, 2024

Day 4: The Jungle Toupee

Welcome back to day 4 of Thingadailies. Want to play along? The full video is here.

Today's starting point: 3:02

Ending point: 4:09

When we finished yesterday, the buffalo had some grass on his face. Today, we give him a jungle toupee. There was a lot of "hm, that's probably good enough" happening on my part today. Will it be obvious in the final image at the end of the month? (Spoiler: Yes, yes it will.)

Ready?

Step 1: Bring in the jungle

The image is then flipped horizontally and placed over the buffalo's forehead.

Step 2: Warp the jungle

This was the first in the long line of "sure, that's fine" moments. Warp the image so it sort of matches the horns. Again, I'm not sure if this is training issue or if GIMP doesn't have the same thing, but I couldn't find a tool that warped the jungle layer like it warped in the video. So I created a path around it and warped that. It was close.


Did I neglect to take a screenshot, or was it so close to the previous one that I can't tell the difference? Either is possible.

And really, does it matter? Because the next thing you do is mask it so it disappears.

Step 3: Unmask the forehead

Not gonna lie here. There was a lot of fiddling with brushes in the video, which means that's probably important, and I couldn't be bothered. Besides, I don't have a bunch of brushes, so I just went with the standard "Cell 02", which is sort of speckled. Sure, that's fine.

I'll let you decide. This is what I ended up with at the end of the day:


Here is a screenshot from the video for comparison:


I think it's pretty close. Also, I think I darkened my buffalo too much, but that's a problem for another day.

Tip of the day:

You can get some nice blended edges by using different shades of gray when painting in the layer mask.


Saturday, February 3, 2024

Day 3: Grassing the Buffalo

Welcome back to day 3 of Thingadailies. Want to play along? The full video is here.

Today's starting point: 2:06

Ending point: 3:02

The technical stuff today was pretty mild — I spent some time in remedial learning so I'm not always doing things the hard way. That included scaling a layer with my mouse, which turns out to be super obvious with an icon and everything. Who knew? 

Anyhow, here we go!

Step 1: Open the hill file and make the sky and rocks into grass

I'd never used the clone tool before, but it turns out to be fairly simple. You just have to choose where to start the cloning (command+click) and then off you go.

In any case, I went from this:


to this:


It turns out that I probably just could have used the original image, since it only needs to cover the buffalo's head, but at least now I know how to use the clone tool.

Step 2: Turn the grass layer sideways and put it over the buffalo's head

I think Photoshop has some way to automatically create a clipping mask, but I just went to the original buffalo layer, clicked "alpha to selection", and then used the selection to create a layer mask on the new grass layer. Then I changed the layer mode to "overlay" and everything looked very cool.


Why turn the grass sideways? I'm not totally sure — I think it may have been because the hill image was taller than wide, and the grass needed to cover the horns. But maybe there's some other reason I never considered.

Step 3: Color levels magic!

I forgot to take an image of the screen, but the mid-point was set to 1.74, which lightened the image significantly.

Step 4: Now hide the green stuff, except for a bit here and there

Another layer mask on the grass layer. After that, it's a matter of painting over the buffalo's wrinkles and horns to selectively let the grass layer through. I think I may have gone a bit overboard (compared to the video), but subtlety has never been my strong point.


And that's where we end the day. Tomorrow, the buffalo gets a toupee, so be sure to check back!

Tip of the day:

You can move frame-by-frame in YouTube! So helpful!

  • comma moves one frame back
  • period moves one frame forward

Friday, February 2, 2024

Day 2: The Buffalo Strikes Back

Welcome to day two of Thingadailies! Want to play along? The full video is here.

Starting point: 1:08

Ending point: 2:06

Well. Let me just say that today things went a little off the rails, but I think I've managed to do the thing. I'm still not entirely sure if this was a me-problem or a problem caused by trying to follow along in GIMP and not Photoshop. Technically, I guess both of those boil down to a me-problem. Whatever. It all sort of worked in the end, so... onward!

This is where we ended on day 1.


Step 1: Add hair to the buffalo outline.

This uses the smudge tool, which is one of my favorite things.

I should note here that I dug out my Huion drawing tablet (that's an affiliate link which will make me about 20 cents) because I use a trackball and it's harder to use a trackball for tasks like this.


Anyhow, you can see that I added some hair around the edges.

Step 2: Color balance magic

Again, this was another exercise in trying to stop the video at the perfect frame so I could read the numbers. I assume this is to make the cave & buffalo look like they belong in the same picture (right?) but I have no idea how you would arrive at these values if you weren't matching a video. It's entirely possible this is a thing you learn with ten years of practice, in which case, I'm screwed.


Step 3: Levels magic — OR IS IT???

This is the first point in the video where I have no idea what he did. I thought things were going well. I copied the numbers and got the levels all sorted out, and it looked like the video...


But THEN, he clicked here and which box turned black and the buffalo lightened, and I have absolutely no idea what that did.


So I skipped this step and moved on with my life. And I can't tell the difference.

If anyone knows photoshop well enough to follow what he did, let me know what happened in this step, would ya?

UPDATE! Figured it out: After changing the levels on the layer (darkening the buffalo), he masked out the layer. (The thing I'd circled in red was the layer mask. So when he inverted it, the entire layer disappeared.)

Then, in step four, he cleared the mask over the buffalo, allowing the darker layer to show in those areas.

Step 4: Darken the buffalo, but leave the horn alone.

Again, I couldn't figure out what he was doing in photoshop to achieve this. So I took a step back and emulated the results. What I did was add a transparent layer, paint over the buffalo in a bit of black, and erase the part where it darkened the horn. (See update above.)

This was also the point where I leaned on the drawing tablet, and suddenly the brush radius kept growing, as if I was holding down the up arrow on the size, and NOTHING I DID WOULD MAKE IT STOP. Soon, the brush was larger than the screen, I'd disconnected the tablet, and the number was still climbing.

At that point, I killed off GIMP, restarted it, and had to redo steps 1-3 because I'd neglected to save before I hit step 4. But it was much faster the second time because I blew right past step 3.


So here we are! Tomorrow we do some fun stuff with textures, maybe.

Tip of the day:

Don't lean on the drawing tablet.


Thursday, February 1, 2024

Thingadailies Begins!

Today is day 1 of Thingadailies, the month in which I'm supposed to create something and blog about it every day.

I had considered making different "animals" or at least posable objects for Daz3D, but then I started looking into how hard that would be. It wasn't entirely clear to me how to do the thing, and I didn't want to spend 6 hours just to get started on day 1, so that's been put off for another time.

Instead, I'm going to follow along as best I can on this Photoshop tutorial/speedrun. Except in GIMP. I'm definitely not an expert, but I'm reasonably comfortable getting around in GIMP, so I'm hoping this will not be impossible.

Want to check my work? Go watch the first 1 minute 8 seconds of the video. It only took me like an hour...

Step One: Create a blank canvas

This is something I can do. width = 3200, height = 1800. So far, so good.

Step Two: Download the images

I had not expected to run into trouble this early in the video. (Like, literally, this is 20 seconds in.) But the files were in an archive with a .rar extension. WTF is .rar format? Nothing on my computer would read that. So I had to do a little research and download another app. My computer may now be infected with Russian malware, but anything for Holidailies. Anyhow, I did finally get the images. Can I legally use them in screenshots on this blog? I have no idea. Cross your fingers!

Step Three: Add the cave and adjust the levels

I mean... The UIs of Photoshop and GIMP are similar enough that I was able to do this, but it's all magic to me. And it involved fifteen attempts at trying to pause the video at exactly the right spot so I could read the numbers. But I did it!


Step Four: Change the color balance

Again, magic! Probably I should figure out why this is being done. Someday.

Step Five: Import the buffalo and remove the background

I'm not great at this sort of thing, but I can do it.


Step Six: Flip the buffalo, scale it, and move it around.

It occurs to me that there's probably an easier way to scale things in GIMP, but I don't know how to do it. I only know how to type in numbers, so there's a lot of "let's try 95%" and then "almost, how about 92% of that" going on. Whereas, the guy in the video is just resizing with the mouse. Am I an idiot for not learning the easier way? Probably. But I did it anyhow.


Tip of the Day:

Zoom in by typing +


So that's where it stands for today. I consider it a success. Come back tomorrow to see me complain about the next minute of the video.